
Task 1: Modelling Theory
What is box modelling?
Box modelling is a technique in which the artist inserts a primitive shape into the scene, and modifies the shape by extruding, scaling or rotating faces and edges. Detail is added to the shape by subdividing the faces or inserting edge loops. A fundamental part of box modelling are quad faces. These are used on almost all primitive shapes, and they are very useful to divide cleanly into triangles for softwares that only support triangles.
Using box modelling, there are some subdivision modelling techniques that are beneficial for efficient and accurate models. Edge looping is a common technique, and this allows you to create new edges around a whole object which can then be manipulated to a different shape. Also, polygon smoothing is conceptually the simplest subdivision technique, it inserts a chosen amount of edges between other edges which also can be set to curve the model slightly. This is great as it adds lots of polygons making it smoother to work with, providing a better canvas for sculpting too.
How to perform a High to Low poly bake using Maya and Substance painter
Starting off, you must have created your model and UV unwrapped it fully. Here I am making a stylised lamp in Maya and this is the low poly version. You must have created your first model as the basic shape without too much detail, as we will add that later using the baking method:

That is the low poly model of my lamp. Now once you have this you must click it, and duplicate using CTRL + D (DO NOT move the duplicated model.)
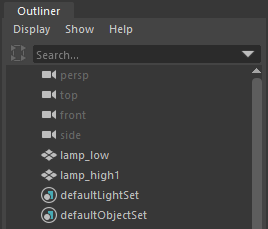
After duplicating the model, open the outliner:

Name your first low poly model to “Object_LowPoly” by double clicking it in the outliner to type
Name your duplicated model as “Object_HighPoly”.
Now you have these two objects, you must click the low poly and press H on your keyboard to hide it. You are now wanting to focus on the high poly.
When you are editing your high poly, do not drastically change parts of the model, especially the main vertices and edges that build the basic shape. Only add edges to edit them, or you can add other primitive shapes and models to yours.
Here is my high poly next to low poly. The high poly is on the right, and i have added screws and subtle details on the bottom to make it more interesting.

The models are done, and you dont need to UV unwrap the shapes that you add to your high poly model.
Make sure to unhide the low poly by clicking it in the outliner and press H. Now export your selected model by File > Export Selection > into a suitable area on your computer. Do the same with the high poly. And you now open substance painter.

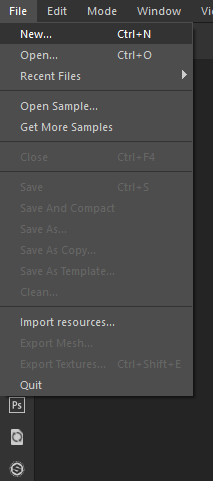
Once substance painter is open, start by going to File > New > Select your LOW POLY


Settings should be like this:
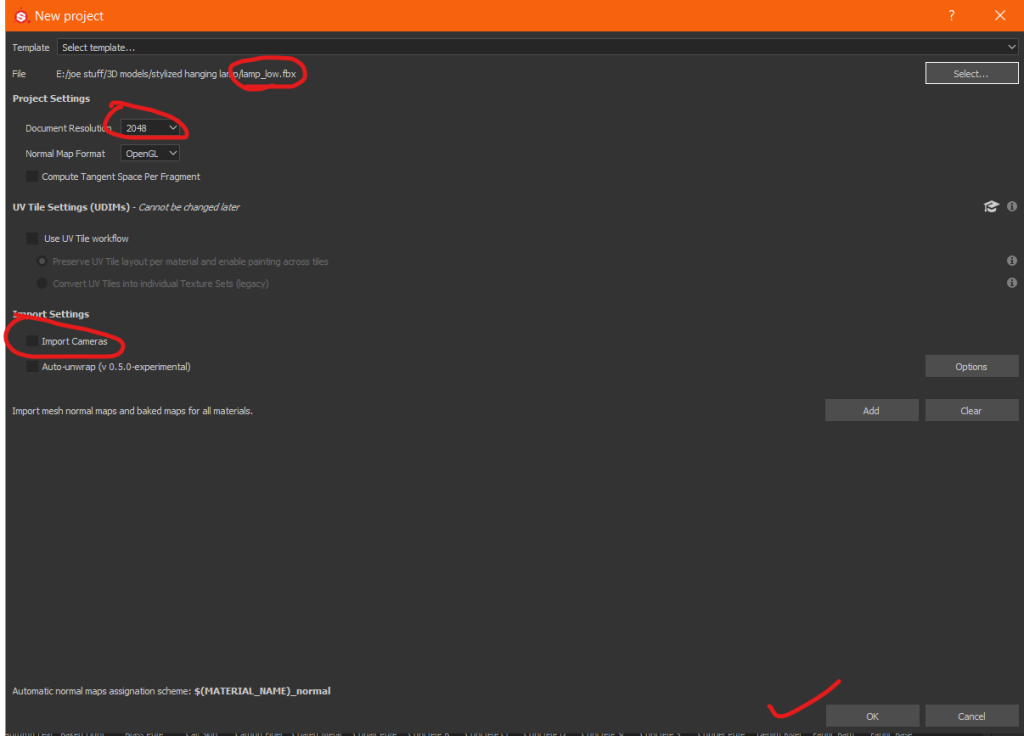
Press OK and your model will load into substance painter:

Now you are going to bake the high poly onto the low poly.
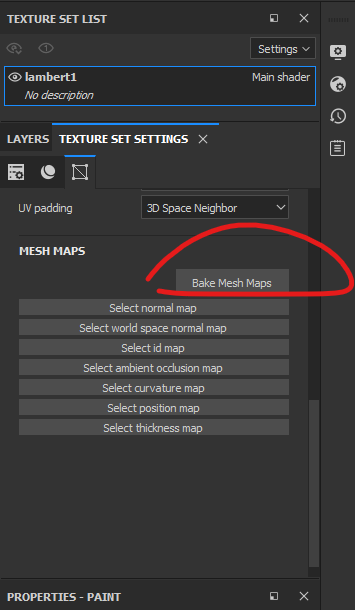
First look on the right window and click “TEXTURE SET SETTINGS” > Scroll down and click “Bake Mesh Maps” > Change the output size to the resolution of your textures, mine is 2048 > Click the paper icon to the far right of where it says “High Definition Meshes” > Select your High Poly model and open it > Bake your textures by clicking “Bake selected textures”.
See below for image instructions:


You may need to adjust the frontal and rear distance as the maps dont always bake accurately first time. Drag the sliders and keep pressing “Bake selected textures” until yours is right. Using all of the mesh maps is not necessary, you can untick the boxes if you dont want some maps.
Here is my model fully baked. You can see the screw looks 3D but its not, also the details at the bottom.

Baking mesh maps is really good for optimising your game performance and it is used in the most popular 3D games. It is very easy to do and reduces lag and resource use in games and engines.
Applications of 3D Modelling
Games
3D assets make up the most of any game today. It is a necessary tool in the game industry for artists because it allows great expression. The models can be viewed from all angles and can portray real colours, features or shapes which is important to make the player feel part of the game and understand the world how it is meant to be seen.
Games need fascinating locations to stand out. A well developed world can make games come to life, and most games use real life and fiction to create the world. A 3D world jumps from the screen and makes it more immersive. An example of this is GTA 5 which has very realistic terrain and everything is similar to the real city of Los Angeles.

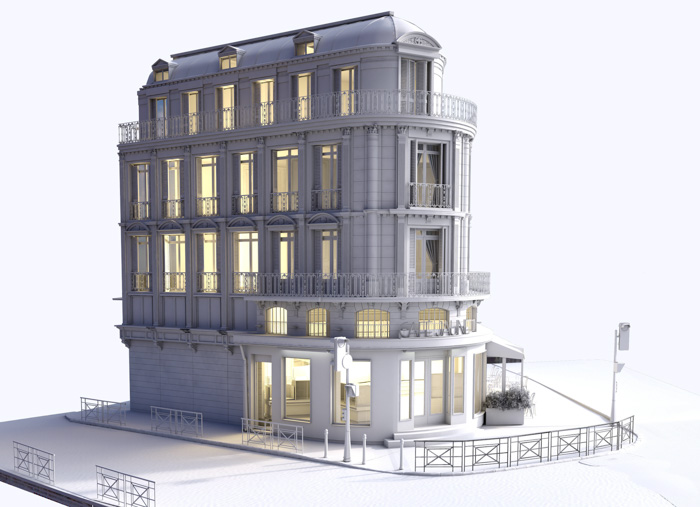
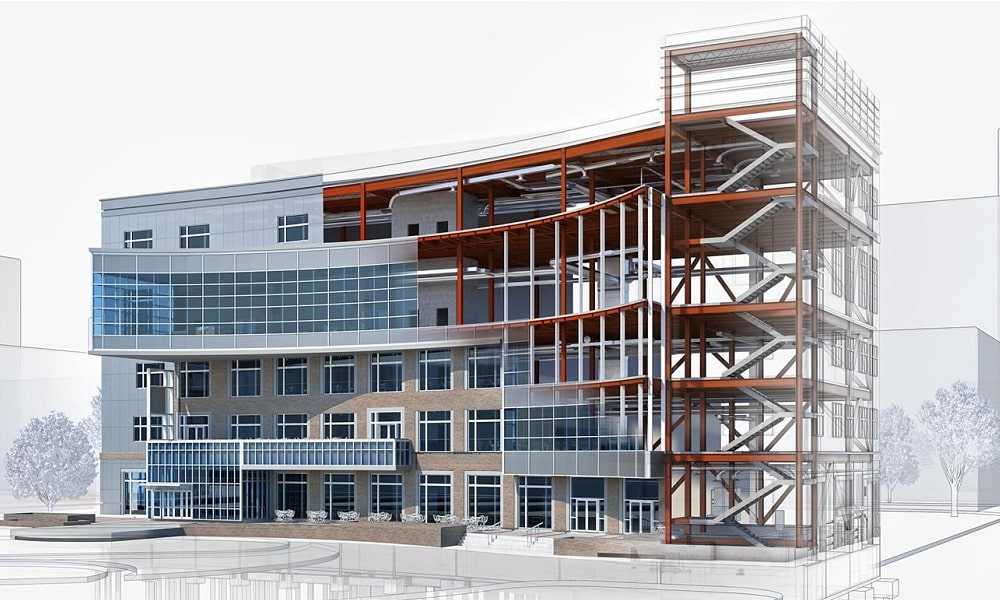
Architecture
The models for architecture are very important because they are more informative than 2D models. They show the viewer the shape and size of a potential building. Also, you can texture 3D models, and this can simulate realistic textures using ray tracing which is important to know what materials are suitable for the building.
Using this for architecture allows for the use of 3D printing, which is essential to get a view with the naked eye and not on a screen.
Animation/CGI
Artists use 3D modelling to make characters and objects in a scene. The character is rigged in the 3D software and animated too. Newer methods of animation involve motion capture, which records an actor’s live movements for digital animation, and this can be baked onto a 3D rigged character for realistic animations. In Maya, the Human IK is used for this.
Here is a really good example of motion capture and it relates to my game idea: https://www.youtube.com/watch?v=YmYkFQG3jho
Not just characters can be rigged, this means that accessories like 3D wings or a cape would be rigged too, to allow proper cloth simulation and movement for the world your game is set in.

Application Programming Interfaces
Application Programming Interfaces are a software intermediary that allows two applications to talk to each other. Each time you use an app like Facebook, send an instant message, or check the weather on your phone, you’re using an API.
DirectX is a series of application programming interfaces (API) that provide low level access to hardware components like video cards, the sound card, and memory. It communicates with the computer hardware and is designed to handle tasks related to rendering 2D and 3D graphics, rendering video and playing audio on the Windows platform. DirectX is used on all Microsoft Devices, including Xbox which got it’s name from DirectX. This API is much cleaner and has better documentation, making it easier to learn. This makes DirectX more popular than OpenGL, and it is always inviting new developers to learn and create. It is always improving and being used more so the cycle of increasing DirectX developers continues. DirectX is widely used in the development of video games for Microsoft Windows and the Xbox line of consoles. DirectX is also used by other software applications for visualisation and graphics tasks such as CAD/CAM engineering.
OpenGL is a cross platform application programming interface for rendering 2D and 3D graphics. It is strictly a graphics API which sets it apart from DirectX, and its purpose is to take data from the CPU to the GPU. The API is typically used to interact with the GPU to achieve hardware accelerated rendering. OpenGL is short for Open Graphics Library. It is much faster than DirectX and it has a smoother and more efficient pipeline. At 303.4 fps, OpenGL is rendering a frame every 3.29 milliseconds; at 270.6 fps, DirectX is rendering a frame in 3.69 milliseconds. That 0.4 millisecond difference is down to how fast the DirectX pipeline can process and draw 3D data. OpenGL is not compatible with Microsoft devices and has been used in Apple Macs and other devices.
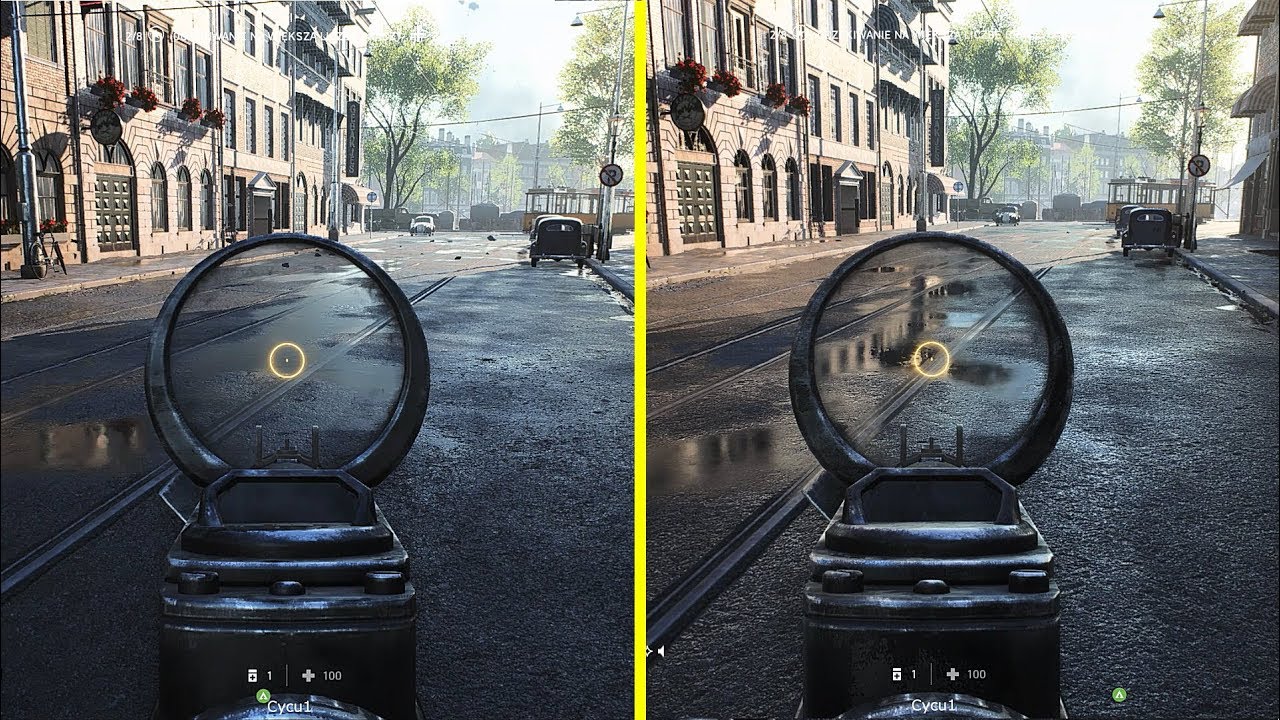
What is Ray Tracing?
Ray tracing is a lighting technique that adds more realism to games. It emulates the way light reflects and refracts in the real world, providing a more believable environment than what’s typically seen using the static lighting in more traditional games. Games without ray tracing rely on baked lighting. The developer places light sources into the environment that looks the same from any angle. Surfaces can still display roughness with a static light source. Reflection occurs when photons bounce off a surface. Refraction occurs when photons travel in a straight line and pass through a transparent surface and the line is redirected, or bent. Destroyed photons can’t be seen as they have been absorbed. Ray tracing tracks millions of virtual photons, and the more there are, then the more surfaces the light will reflect from or refract. This technique also allows the player to view light from different angles, which could change the look of a surface texture because the light is more focused into every part of the environment, and not only where the source of light is pointing. This means colours from objects can be reflected onto surfaces like in real life and water will look more realistic. Materials with more detail will show an increase of precision in the height map and normal maps which can make the game aesthetically pleasing for those who enjoy realism. Ray Tracing is mainly noticeable in the water reflections. Instead of a flat colour, refraction takes place which distorts the reflection like it would in real life.

Constraints of 3D Modelling
There are three main constraints that a 3D artist will have to take into account when creating 3D models. These are polygon count, file size and Texture Resolution.
Polygon count is a very important factor in 3D modelling because it affects the performance of games and render times dramatically. Keeping a low poly count means the model will not cause as much FPS lag in a game. However, without high poly modelling, we would not be able to sculpt with high detail which is a limiting factor to some photorealistic renders. Also, Game engines would struggle to render assets and take longer if they are such high poly.
Games use triangles because modern graphic hardware is built to render triangles faster than other polygons. A game model may stretch from 2 triangles for a wall, to 40,000+ triangles for a complex character.
Another constraint could be computer hardware. Less powerful computers will not be able to render or handle so many detailed assets in a software or in game. It’s important to keep to a polygon threshold for different types of assets.
Props for display: 8k tris
Interactable Object: 9k
Characters / Animals: 1st person ~ 10k – 15k tris | 3rd person ~ 10k – 100k tris
File size is very important especially for video games as they are often put on to disks with limited storage capacity. You must invest in high capacity storage so your data is secure and you can store almost everything that you have made for a game. It is easier than using many storage devices as they could get broken, corrupted or lost.
Task 2: Planning
Mood Board
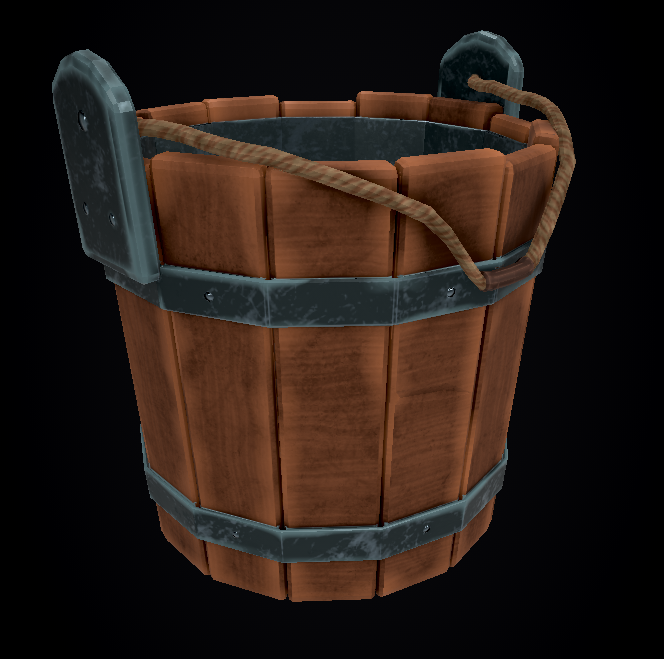
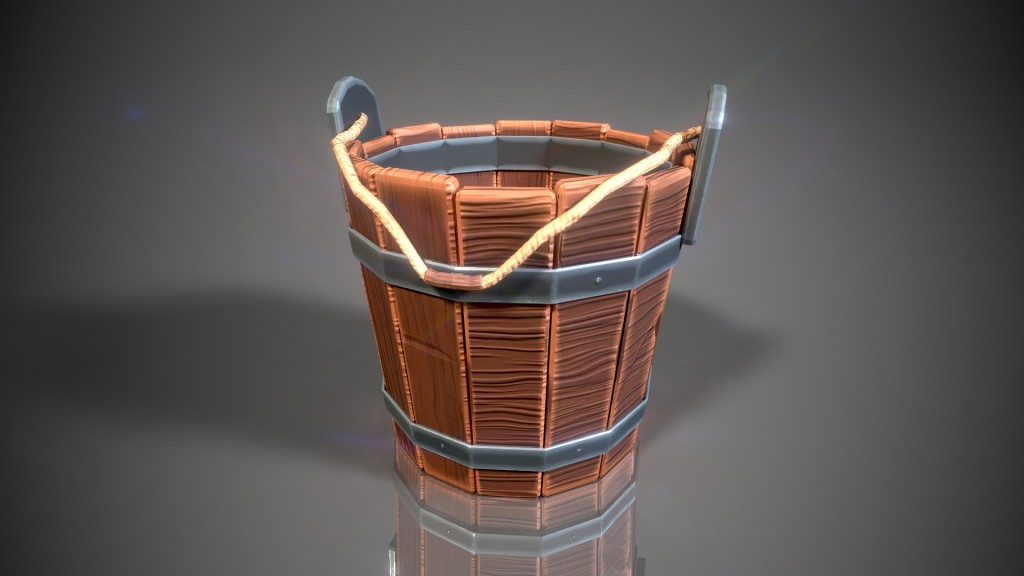
This is my mood board for an Antique Wooden Bucket:

I chose images that show a top angle view and a front view. My bucket will be stylised, so I got inspiration from other people’s work too.
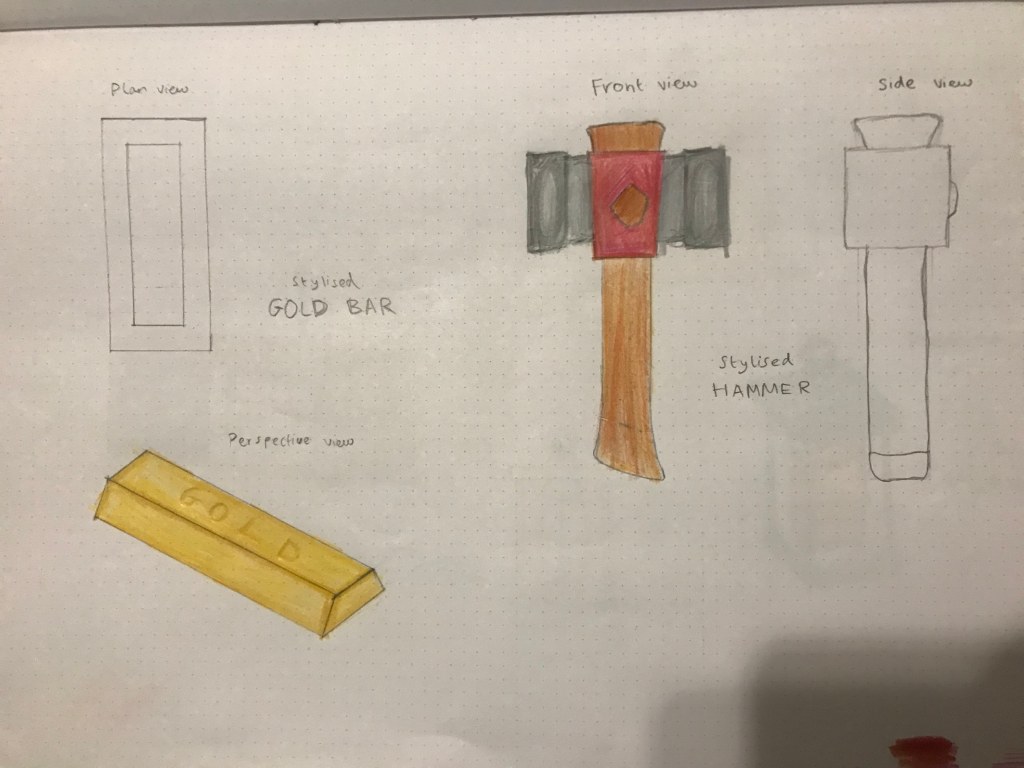
Concept pieces for my prop


Target Audience
My prop is a wooden bucket and targeted to a 10+ audience. It is designed for a stylised pirate / medieval game like Sea Of Thieves, which is suitable for the younger audience as there is no gore involved in the deaths of characters. This prop would not be fit for a game like Animal Crossing as it is not so cartoony but shows more realism and detail. A 10+ audience would enjoy this prop more as they start to grow out of cartoons and single shaded bright coloured games they would play as a young child. It would appeal to them as they become more open minded and want to explore different styles of games, and they would appreciate the detail and art style in depth.
Ethical Considerations
My asset does not infringe copyright on any assets which is a good ethical consideration. It is suitable for young audiences as there is no gore or violence related to it. Another reason is it suitable is there is no symbolism which could offend someone, and this includes anything related to hate speech. My model is not pirated which means it is not being stolen or sold without permission.
5 props from discovered 3D Artists
Artist Name on Sketchfab: yarenyao
This artist has painted the textures an hasn’t used any good methods to allow parts of the model to show depth and shading. The textures are poorly painted, and there is an obvious seam where the UV has been cut. The best thing about the model is they used the extrude tool to create wooden planks. I would improve this by high to low poly baking the metal rings, and trying to cover the seam as best as i can with the textures.

Artist Name on Sketchfab: Simon T Griffiths
This artist has done a good job of baking the textures, and they have covered up the UV seams very well. The screws look 3D and the scratches look very realistic and have depth. They have textured it nicely and it is clear they have used reference images to get the full antique style. One improvement could be using more textures to style different parts of the model, because only one metal texture has been used and that would appeal to me more.

Artist Name on Sketchfab: 3Dee
At the first look of this lamp, I like how they have used baking and lots of PBR maps to add roughness and depth to the model. I can see some skewed UVs on the bottom where the rust is distorted, and the artist has tried to cover this with the shadow. To improve, they should use a higher resolution such as 2048 to make the cracks look more believable, and take more time to unwrap carefully which would make everything look cleaner.

Artist Name on Sketchfab: squeek300
The textures are high quality and I like the colour choice. There is a grunge on the bell to show fingerprints or dust as if the bell is old and used, and also a crack on one side. The poly count for this model is good for a prop, it has 1.3k tris, this could be reduced slightly but its fine for a decorative prop. A problem I see here is the UV seams are not lined up, which makes it harder to hide the seams when placing the prop in a game environment. Also, I checked the UVs and they are not oriented straight which will cause different textures with height details to be at a strange angle. Finally, a small bleeding of textures in the crack, but this would not be seen in a game. To improve, scale and rotate the textures to hide the UV seams as much as possible and edit the frontal or rear distance on substance painter to reduce bleeding in the crack.

Artist Name on Sketchfab: rahad
I like the use of colour id baking to simulate wooden planks on each side of the crate. The textures are high resolution and the poly count over all is very good. They have edited the roughness and metallic parameters for the most accurate representation of the materials. Issues arise with the skewing of textures on edges of the crate, where the UV map was not properly cut or unfolded. Textures do not fit the appearance of a crate that we are used to seeing and there is a random metal texture on top. The sides of the crate could be improved by extruding inwards to give more depth and a perception of wooden planks.

Weekly Project Plan
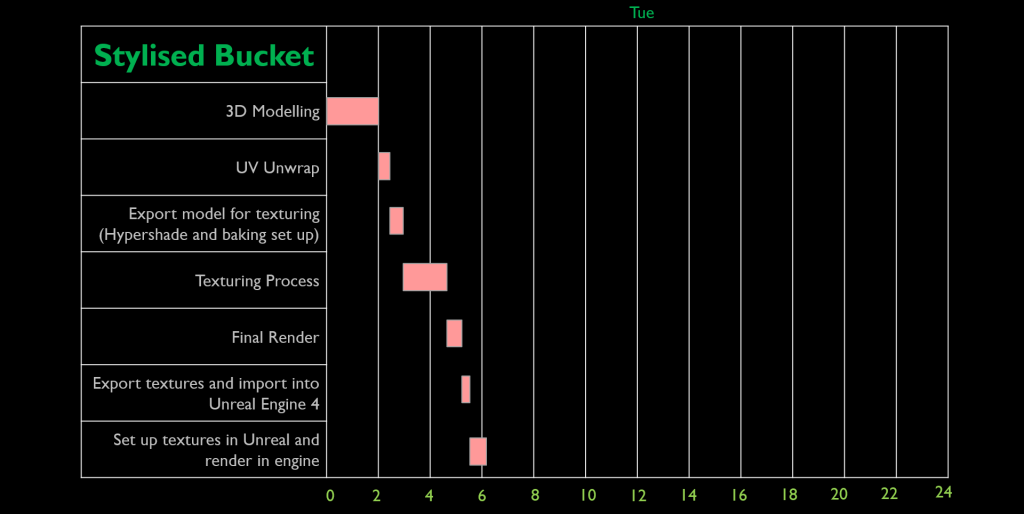
This is the plan for 1 model a week:

I completed models quite easily, which meant I could do more than one a week. Here is the time it took to make my bucket within a week. I started on Tuesday and finished on Tuesday, but with more complex models, It would take longer. I aim to finish models within 2 – 3 days which is enough to prepare for another model in the same week.
Task 3: Prop Modelling
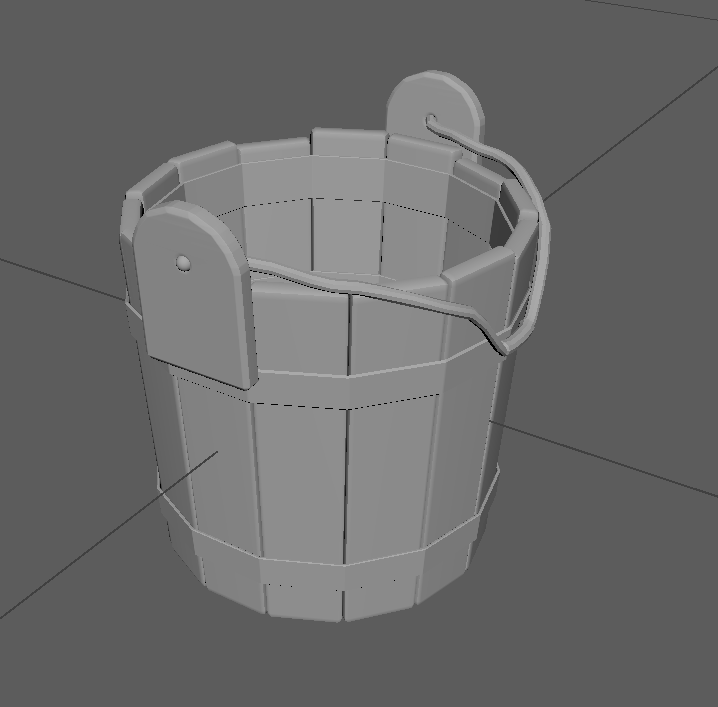
Documenting my final 3D prop
I made a wooden bucket, and this is the process I went through to create it in the stylised genre. I will cover the modelling, UV unwrapping, texturing and importing to Unreal Engine.
MODELLING
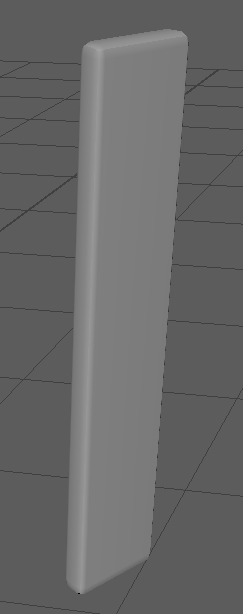
I used box modelling and subdivision techniques to create this bucket. I first started with a cube, and scaled it into a rectangular prism. Then i bevelled the edges to make them smooth since this is a stylised prop, I feel it is necessary to do this with my style.
I then duplicated this piece and zoomed in all the way to perfectly join them together with the move tool. Then I duplicated both of those and repeated the process until 14 were joined in one line.

Once these were together, I needed to curve the pieces into a pipe shape. To do this I first combined the pieces using the Combine tool in the modelling toolkit. Also, I had selected the top of some pieces to pull them up which makes the planks look uneven.

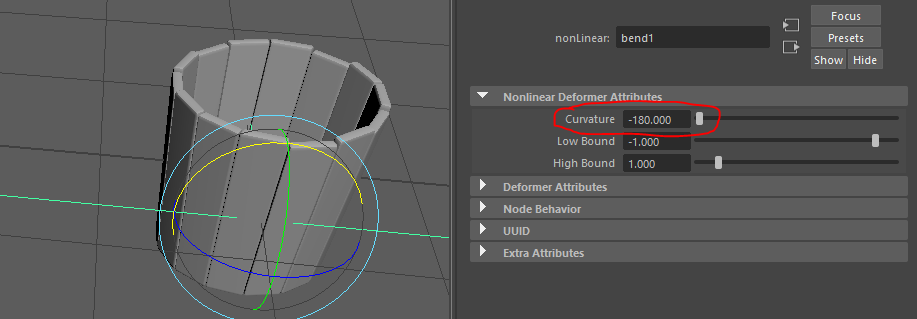
Once combined, now I need to bend the shape. I select it and do Deform > Non Linear > Bend

This creates a thin bend handle which can be manipulated in the Attribute Editor on the top right.


First, I needed to rotate the bend handle to the correct position or else the model would bend in the wrong direction like this:

I rotated the handle using the rotate tool by pressing E, and in the modelling toolkit I typed the values of: Z – 90 then Y – 90.
This aligned the handle accurately inside the model. Now I can bend using the curvature attribute, and this automatically connects the ends of the model with collisions.
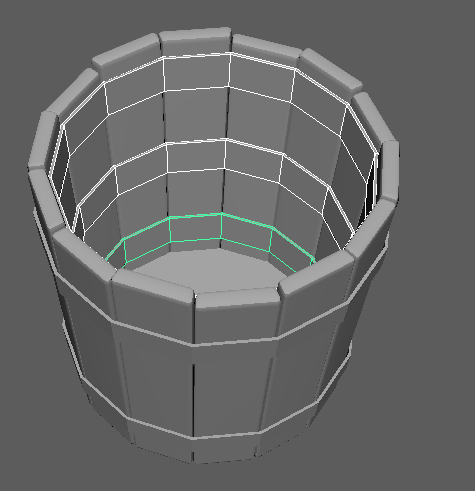
The model has a slight tilt outwards which is good, but i want to exaggerate this slightly to fit the style. To do this I simply rotated the X axis:

Next I made some metal rings around the bucket, and to do this I used a polygon primitive pipe shape from the create tab at the top of Maya. Using the attribute editor again, I changed the subdivision value to 14 to match the bucket.
I scaled the shape to fit around the bucket, and this took some messing around with attribute editor to get the right radius and thickness. With the bucket’s sloping sides I had to select the faces of the pipe to match the shape of the bucket. I did this by selecting the bottom faces or top faces of each ring and scaling in or out.


The top ring is used for the inside of the bucket too. I duplicated it and scaled it to fit the inside just like I did on the outside. It makes the bucket look reinforced.
Now I made a part for the handle of the bucket. This was made with a primitive cube, and scaled and extruded to make a rounded shape. I bevelled it to create the smoother edges. I duplicated this and added it to the other side by rotating and moving.
I also quickly bevelled the metal rings with fraction 1 and it looks much better, both inside and outside.

Finally for the Low Poly I need to create the rope for the handle. I could make a steel handle but i wanted to challenge myself and create a believable loose rope.
I inserted a polygon primitive Helix. This shape looks like a coil, and I thought this would be an easy way to create a rope shape. It took a lot of attribute editing to get the right radius, thickness and length.
Here is the helix when imported:

I will edit these attributes to get the desired shape:

This is my final result of using these values:

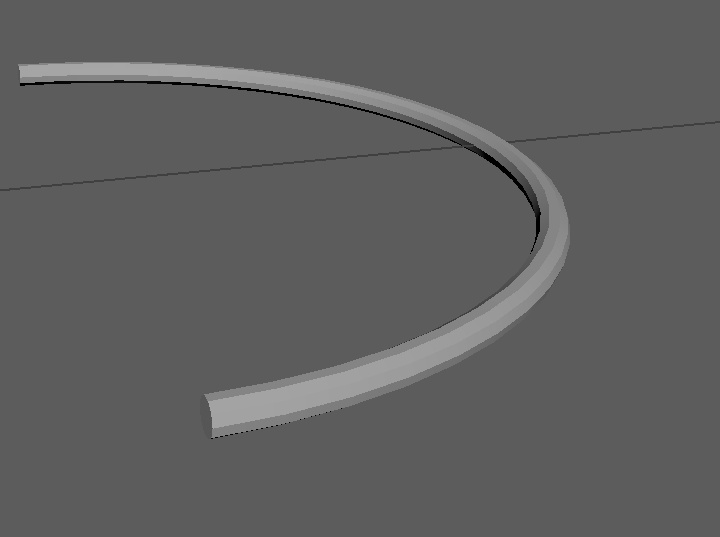
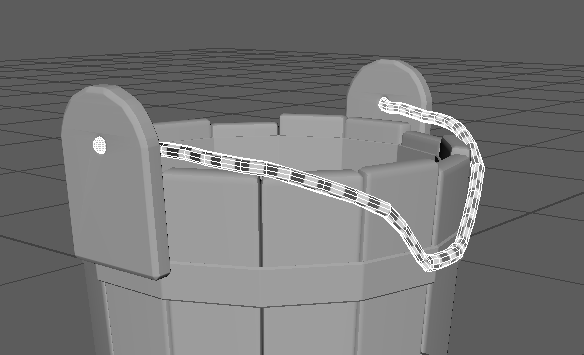
A simple curved cylinder is the shape i needed to start working on the shape of a rope. from here I moved the rope above the bucket and between the 2 pieces on the sides. This allows me to shape the rope according to the bucket, so it looks like the rope has some slack. You will notice that the rope is shaped unevenly. This is done on purpose to make it look like there are physics affecting the rope like in real life, so it’s not symmetrical.
Here is the rope shape:


I selected the faces on the end of the rope to create what will be a handle, using the extrude tool and scale tool.


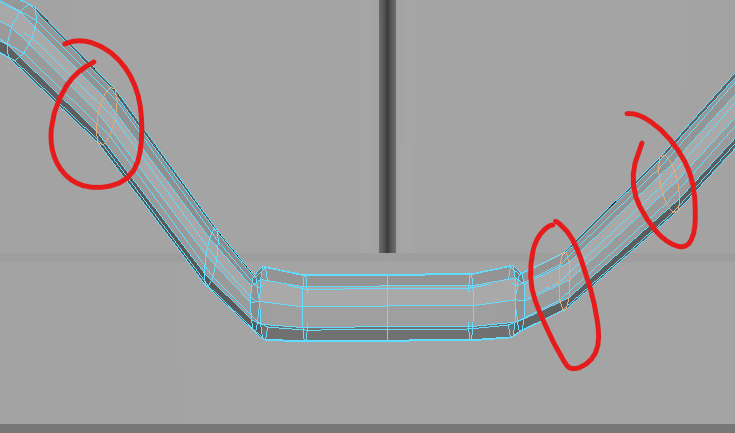
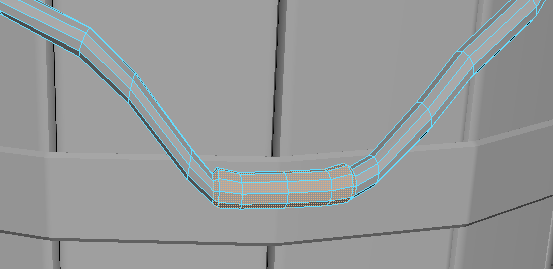
The rope’s edges started to twist and rotate as I was shaping it, so I had to go back to some edges to straighten them which makes the rope look thicker and even on all angles. I used the rotate tool.
Finally, I needed to add the holes for the rope to go in. I used the boolean tool to create a difference with a cylinder and the pieces on the sides of the buckets. I needed to rotate the cylinders and scale them correctly.


After creating the holes, I selected all the faces inside and extruded it to create a bevelled edge. The regular bevel tool was not doing enough. I used the values Thickness – 0.012 and Offset 0.005 which was perfect to fit the rope without a big gap.

I added spheres into each hole after as bolts in there holding it together. Halving the sphere will reduce the tris of the model as they are useless and will not be seen, so that’s what i did.

Now the bucket is modeled I will unwrap it.
UV UNWRAP
I will be unwrapping seperate parts of the model because it is easier to see what I am cutting and sewing. I will combine all parts at the end and lay out all the uv’s together. There were no problems encountered with unwrapping.
First I started with the Planks, these were easy to unwrap because they are rectangular prisms.

Steel rings.
Rope.
I separated part of the rope to create a handle
Inside Steel.

Rope holder.
I had a major issue with the unwrapping of these parts. The boolean created many unwanted edges which would cause my uv’s to be distorted. The bevels interfered with the boolean process.

I decided to remove the holes and bevels, this would also reduce the geometry. Using a cube I made the shape again.

Base.
Finally, I need to unwrap the base of the bucket, this is the easiest part.

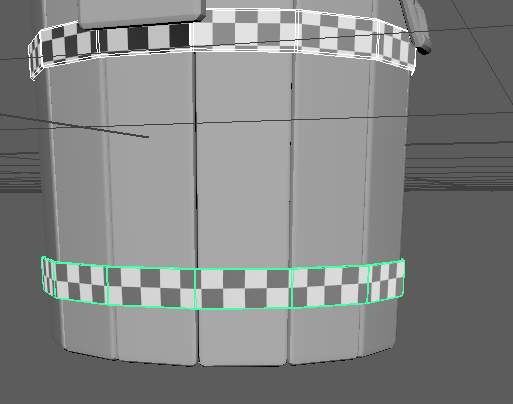
Now all uv’s are complete, I will combine the parts and set the texel density, and layout to make all of the squares the same size.
As I combined everything, I selected the uv shells and used the Orient shells tool to make sure the squares were straight.

EXTRAS
Now I have unwrapped the model, I need to add some details to make the bucket look stylised and aesthetically pleasing. Using Mesh > Reduce, I reduce the polygons of the overall model to reduce tris.
Cracks and chips are going to enhance the style of this bucket, and also baking some nails will look good. First a duplicate model is necessary for baking.
I decided to separate these caps and bake them with the high poly because it will significantly reduce the tris.

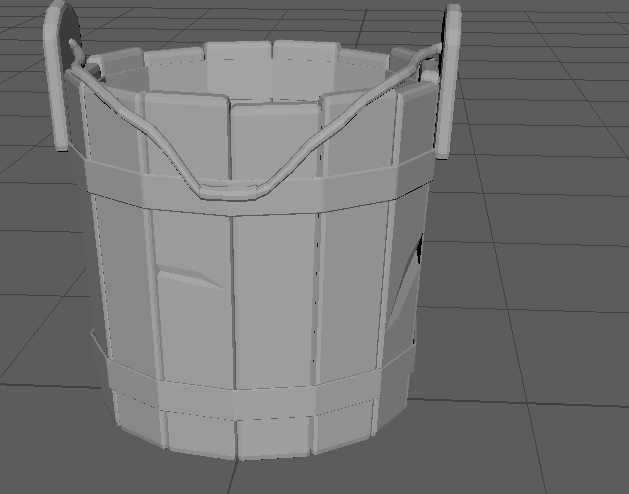
This is the low poly
This is the high poly

The multi cut tool allowed me to insert these damages. Also I have added half spheres as nails which will be baked.
Now I have finished the modelling, I will texture.
TEXTURING
Texturing will be done using colour id maps. It is the best way to save resources in unreal engine and also looks great.
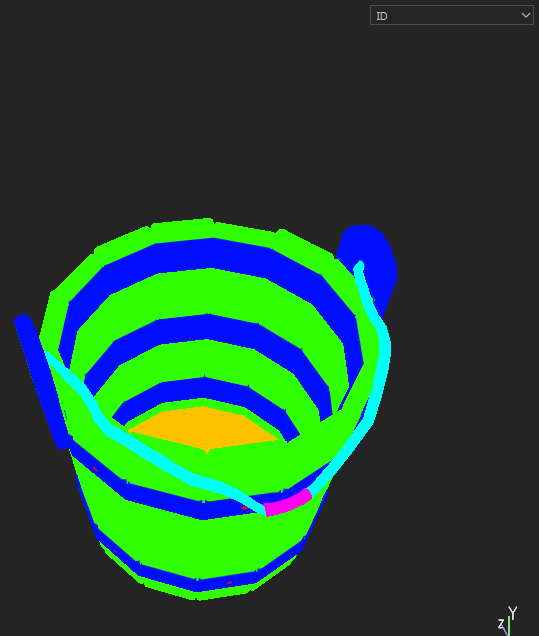
Using the hypershade window, I coloured the high poly with vibrant colours to see everything easier on substance painter. I needed to create new lamberts for different areas of the bucket. Also, I had to use Edit mesh > Extract to separate the handle from the rope.

This is the colour id high poly bucket. The colours will be baked onto the low poly along with the nails.
Once importing the low poly into substance painter, I baked the mesh maps. I had to change the frontal distance to make the screws appear properly, and it showed better than I expected. Also I inserted an ambient occlusion map which will enhance the shadows.

First, I clicked and dragged a material onto the bucket. I realised I made a mistake by editing the low poly after unwrapping. I had to go back and unwrap the wooden planks again and come back to this stage a few minutes after or else my texture would be skewed inside the dents.
I used a smart stylised wood material as that is the design i am going for.

Once the material is applied, I right clicked the material square in the layers tab, and added a black mask. Then I pressed B on my keyboard to view the colour id map. Now I right clicked the black mask and chose Add Mask with colour selection. This allowed me to pick the colour i wanted to apply the material to, and this is why colour id baking is so useful. There was some colour bleeding so I had to keep adjusting the frontal and rear distance to make the colours fit accurately.


Now I picked the colour and my material was applied. Then I tweaked the appearance to look how I wanted it.

I did the same process until the bucket was finally textured. Because I wanted to learn how to create my own stylised material, I edited this preset, added more layers and painted my own colours and shading onto the bucket. I am pleased with the end result.
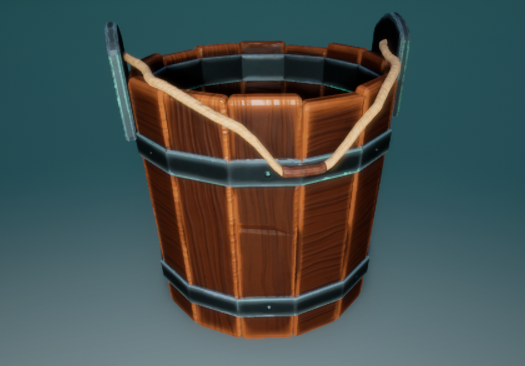
I created another design for the bucket which was more cartoon stylised and I rendered it in Substance Painter.
EXPORT AND IMPORT TO UNREAL ENGINE 4.21.2
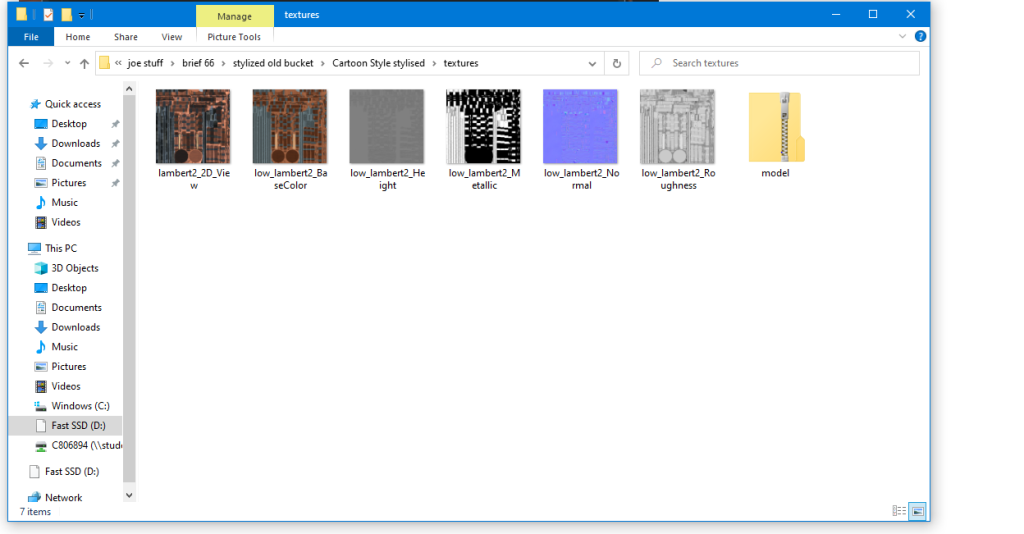
To export textures, I use the substance painter texture export. I click File > Export Textures > Choose file location to my SSD > drop down and choose PBR Metal Roughness > 2D view if you need to.


Sometimes I export and use the 2D View, but for the bucket I didn’t need it. I exported it anyway just to test against the base colour map in unreal engine.
I click export and it all goes to my textures folder.
To export the model from maya, I clicked the Low Poly Bucket > File > Export Selection > Change to FBX format > export to suitable location on computer.
To import into unreal engine, I can just select the low poly fbx in file explorer, and also all of the textures. I create a folder called StylisedBucket to contain all of the items for the model. Simple drag and drop into unreal and click import. This places everything into the folder viewport. I dragged the model into the scene and then I got to work on adding the texture maps.


I double click the Lambert1 green Material, and deleted an object called Param1 which is a default map in there already.

Now, this view port is empty and I can drag my maps one by one and connect to the Lambert1. The maps are already named by substance painter, which makes it much easier to know where I am connecting.

First was base colour, and its just doing this until all maps are connected.

All maps are connected, now I apply it by clicking Apply on the top left of the viewport.

Here is the model in unreal. I used a spotlight, and edited the post processing effects like in substance painter and sketchfab. Using depth of field, vignette and the render effects, this is the render I took with the high resolution screenshot feature in Unreal Engine 4.


Task 4: Upload and Evaluation
That is my full workflow from a primitive cube to a game ready prop. Link to the model: https://sketchfab.com/3d-models/stylised-bucket-34bf35aa9dbc4dba96b43a6cd2a211d3
Evaluation
I feel that I did well with the Unwrapping and Texturing mostly because everything looked how I wanted it, and the UV space was well utilised. I was able to make my own stylised textures and edit presets to create a stylised asset. This project has also interested me into smart materials to create better materials.
I had some set backs with 3D modelling as I needed to re design some parts due to Ngons, and overall bad topology. This didn’t take long but it was still an interruption in my workflow which could have set me back if I was inexperienced. I overcame the problem by creating the object from scratch and aiming to keeping a low polygon count and making sure to keep a quad based model or tris by poking faces with Ngons.
To improve on this project if I had to do it again, I would focus on getting a lower poly count, and take more time to delete unnecessary polygons from the surfaces of the model. Also, I need to make sure my UVs are rotated to the same direction which I didn’t do for all of the pieces, and this caused some imperfections in the angle of textures on each piece that should have the same design.
